Saturday, December 18, 2010

So much to do, so little time.

I took these pictures over a week ago. All of these items went to the action block at work to help raise money for the Holiday Party. It was fun carving them and it was also a fun to see joy on the buyers faces.


These are all larger than I usually post. Also, I don't think the shots are as good. I was in too much of a hurry getting the pictures to bring out the picture box. We left right after the last picture was taken.

Enjoy, and be careful of the splinters.

Sunday, December 5, 2010

Ready for paint

Here are 4 Santas I carved, using the blocks as described on Oct. 12. One of these you've seen before, but here are 3 more, getting ready for paint, hopefully today. So much to do, so little time. I need to go up on the roof and replace fuses in one of the strings, then move the main power to a new location to lighten the load a little.


Enjoy, and be careful of the splinters.

Wednesday, November 24, 2010

Hey its 2 in a row

Here is an in-progress shot of a Santa Clause I am carving. Its not supposed to realistic, more of a rustic or Americana style, though neither word may be right. Any way it is 12" tall. More shots to come.


Enjoy, but be careful of the splinters.

Tuesday, November 23, 2010

A Gift for a Retired Co-Worker

It's not like I haven't been doing any work. I've just haven't posted samples of it as I needed to. The box I'm showing here is one I've worked on since early October. I didn't get it done in time for the retirement, but I'll see the co-worker at the Annual Holiday party. These pictures are taken without the flash, as the color seems to change due to the intense white light.

The wood is Myrtle Wood and Black Cherry. The sides are 1/2" thick. I built the box, top and bottom as one, then cut through the sides after the glue was dry. Makes for a perfect fit. The handle was attached with a small biscuit (if you don't know, don't ask). There were no major problems this time, other than time and making a jig to cut slots in the corners for the wedges. It all worked fine. I used Boiled Linseed Oil (BLO) for the finish, then waxed the box with a liquid wax from Watco.


Enjoy, but be careful of the splinters.

Friday, October 29, 2010

Frankie

I finished painting this one last week, but it took a while to get it posted. I must apologize to my readers for holding it back, knowing how you all desire to see a constantly changing world and needing immediate gratification by viewing the activities of others. Ok, so I'm a little sarcastic, but get a life. This is the guy I carved while down in Silverton during a Carver's Retreat. The bolts are real. I used acrylic paints on this carving. The vest was not part of the original design, but I added it when I was cleaning up the carving to prepare it for painting. The pants are charcoal, the shoes are black, the vest was purple. All basic colors. I added black for shading of the vest bottom, but lilac for the vest top. The face was painted leaf green. This was a great little carving and by changing only the head you can carve a bunch of different characters.


Enjoy, and be careful where the paint drips.

Saturday, October 23, 2010

Not Quite Wood


It is almost Halloween and I needed to carve a pumpkin. My wife said I shouldn't have used myself as a model for the face. It didn't take long, but pumpkins are notorious for rotting quickly after carving. This one I needed for tonight. Note that I did not hollow this pumpkin out, just carved the face.

Enjoy, but be careful of spooky spirits.

Tuesday, October 12, 2010

Jigs for more Santa's

I carved another Santa last night, but instead of just showing you the Santa, I've included pictures of the jig I used for cutting the base shape. The initial design came from Wood Carving Illustrated magazine. I built a jig to cut a 12" 2x2 in half, corner to corner, on the bandsaw. As you can see from the picture I took a 2x4 and made 2-45 degree cuts to create a trough to set hold the board stable. I then attached the 2x4 onto a scrap piece of plywood. I feed this slowly into the bandsaw less than ½ of the way into the jig keeping to the center as best I could. With the jig still in place, I powered off the bandsaw and clamped the plywood to the table. After that I slid a 2x2 into the blade and the result is 2 pieces cut corner to corner.

I the cut one of the 12" diagonal pieces into 3 chunks and you can see one of the resulting Santas. Pretty cool.

Enjoy, and be careful of the splinters.

Sunday, October 10, 2010

Santas Already

Here are two Santa's I carved during a woodcarving retreat. These were done from Basswood eggs. The larger one took about 2 hours to finish, giving me an hour to carve the next one. After I got home I textured the smaller of the Santas beard, mustache and hat brim using a small v-tool. The eyes were each painted, after which I coated them with BLO and painted them with acrylic washes until I got the tone I wanted. One of these will go to my auction at work and the other will stay home.


Enjoy, and be careful of the splinters.

Thursday, October 7, 2010

Another Carving

I'll be giving this one away today or tomorrow to a friend, so here is a final look. I used a pattern in a book for the design. I'm also going to carve one for me as I like the design and the way it turned out.


Enjoy, and be careful of the splinters.

Wednesday, October 6, 2010

Mama's quilts

While these aren't wood stuff, Mama made these Halloween quilts and I wanted to show them off, so here they are.


Finally, here is a Fall lap quilt to crawl under when it gets cold. The temps are already into the low 40s at night and this quilt is comfortable. We've both already tested it out with a snooze.

Bottle Stoppers - renewed

I found a couple of bottle stoppers that I carved about 5 years ago and decided that I didn't like the way they looked. Too square and blocky, with no character. I re-carved them leaving the ears, nose and hair lines, at least most of it. The front ended up with a whole new look. While I prefer to use a linseed oil coating for most of my work now, I left enough of the original paint on these that I needed to repaint these also. The looks are about a 100% improvement, so I'm happier with them. Oh, yes, I would still do things differently if I started over, but I don't always have time for that and fixing them presented a nice challenge. Neither of these had been seen by anyone, as I kinda hid them away until now.


Tuesday, September 21, 2010

Finally, another post

Yes I know, it has been a while. My excuse is I was gone most of August. But I did get a little done. I planted grass in front of the shop, and it is just starting to come up, at least a couple of blades. I finally put wallboard around the electrical panel to fill in the gaps from when I had the panel replaced, just shy of a year to do it. My big brother helped. See the picture.


I finished carving a sun that I had been working on for about 2 years. Painted, but not yet sealed or hung. I need to add a hook to hang it. It is bright, but it is the sun. For those that don't recognize it, the sun is a Shawn Cipa design.


I went to the Carving Rendezvous put on by the Salem, Oregon Capital Carvers. I spent the day there learning from people that like to teach, with a lot of people that like to carve. I included samples by Dave Disslbrett from a class I took there. I had a great time and it was nice to talk and listen to people that enjoyed carving.

For now, enjoy, but be careful of the splinters.

Wednesday, July 28, 2010

In the Yard

Well, not many finished projects, but here is some of what I have been doing. I built the wall across my back yard to separate the 2 levels. I haven't glued down the top row of bricks yet. I'm also moving dirt still, lots of it. I don't plan on planting grass until fall so I'm not pushing the work too much. I still haven't finished the final little pieces on the brick patio. I really need to get that done.


The rototiller handle broke while a neighbor was using it. No big deal, but they did get it welded back together for me. It's over 30 years old and still working.


Here you see our garden, all in pots under the deck to stay out of the heat. They look great and this picture is full size so it will take longer to open.


Enjoy, and be careful of the blisters.

Thursday, July 1, 2010

Current Projects

Ice Cream Scoop


I haven't been entirely away from wood working lately and here is an Ice Cream scoop that I turned from a piece of Myrtle wood and a kit that had the two brass parts. The scoop part that inserts into the Myrtle wood handle was not round, close maybe, so I made a little extra epoxy to make sure that I had enough to fill the hole I drilled. Also, there was a knot at the back end of the handle that I turned away, at least I thought I did until I parted the handle of the lathe. The end had a crack in it, so I sanded the end by hand, filling the crack with sawdust. Then I added some this super-glue, let it dry, then repeat until the crack was filled.


Sugar Scoop


This unfinished piece was from a branch of an ornamental fruit tree I cut down to build the shop. As I was turning I thought the color was great, but as I got to the center of the wood, I found that the core was almost rotten: very brittle, soft, and easily damaged. I turned the scoop center and did have a knot bust out, taking the whole side with it. I used the opening to an advantage so I could see how this the bowl part was. But when I got to the handle, the core either ripped out or was already gone, so the second picture shows why I didn't finish the scoop. I figured no handle, no scoop.

Spoon


I took another branch of the ornamental tree and split it down the center so I wouldn't have to worry about the rotten core. Here you see the first half of the branch that I turned to get ready to make a spoon. At this point the wood looks pretty good, so I'm hopping I can finish this project.

Monday, June 21, 2010

Count the Blisters

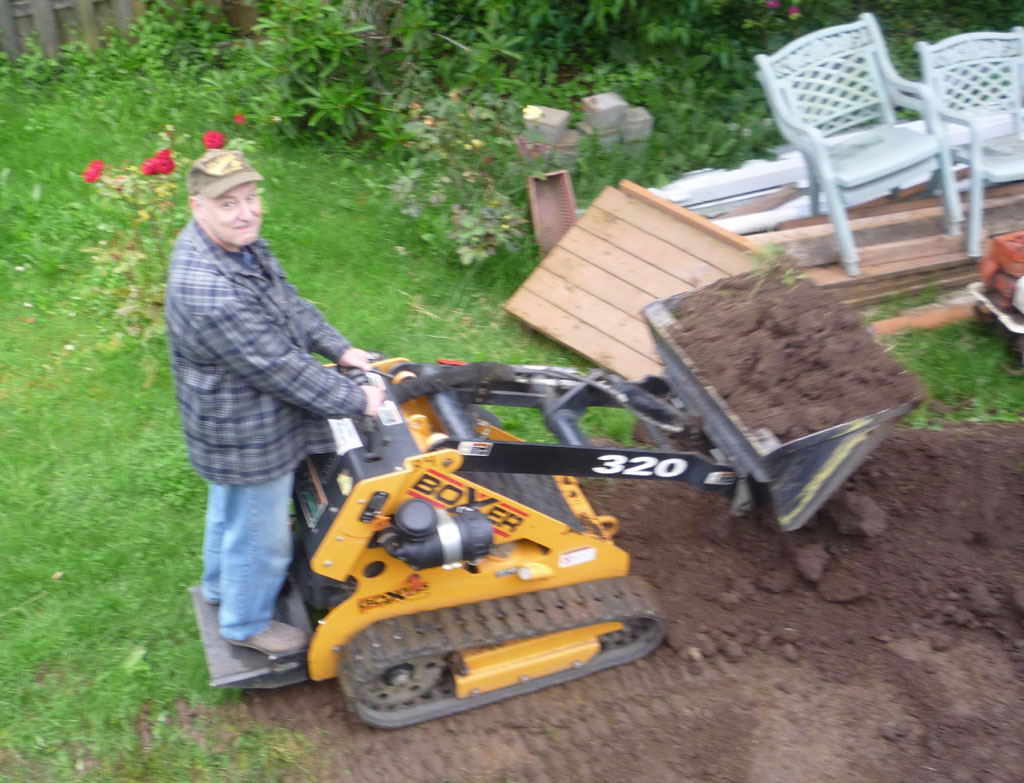
Who would have thought driving a little tractor around would cause blisters. But after 10 hours of riding the little Tonka Toy, I had 3 blisters on each hand. And I was wearing gloves. A neighbor of ours needed fill dirt, and I had a lot to get rid of. I went to Home Depot and rented the 360, which has a 34.5" width, and used it all day moving dirt from my backyard, out the front, then down the street one house and dumping it. I'd guess I moved over 10 yards. I was going to add a link to the tractor, but they don't have it listed on the web-sites. I ran up my brick walkway and through a 36" gate more times than I could count. First the four-plus yards from my pile I had been moving around, and then I started lowering the area right behind the patio. I did not get it done, just ran out of time. I had to turn the tractor in before they closed that night, and I made it with 15 minutes to spare.

Several times it rained/misted on me while I was working, but I couldn't afford the time to stop. It made it a little slick, but it was still kinda fun. A big kid with a Tonka toy.

While it doesn't show well in the pictures, there is about a foot between the upper and lower sections of the yard. I probably still have 4-6 yards to remove from the back side, and to level the ground. I took a break today and just weeded one of the gardens in the front. I probably will build a wood retaining wall for now, and change it to brick or stone later. I'll need to add a step as 1 foot is too high for the Misses to step. Sorry about the picture quality of me on the tractor, I wasn't taking them.


I also added a current picture of the patio. I have a few wedges to cut/grind, then sand, but it needs to dry out before I can put the sand down.