
Friday, December 23, 2011
Corian Spiral
Here is a picture of a stack of corian ready to be turned on the lathe for a pair of handles. These were meant to be done by Christmas, but time is getting away. I'll post again after I attempt to turn this mess.

Saturday, December 3, 2011
Santas and More
It has been a while. Our work auction that raises money for our annual holiday dinner just took place. My wife an d I included these items in the auction. I will start off with my carvings, four of them. Each of the Santas have a unique characteristic and all were fun to carve. I pushed it again this year and did not paint them until the last minute. I antiqued them and sprayed a final coat of sealer the night before the auction. I've got to learn to get this done a little earlier. I had to use a magnifying light to be able to see as well as I would like, and have decided that I'd better do them same when doing the finishing carving. I got a little sloppy on some of the fuzz.


 The next pair of pictures are projects that my wife worked on for the auction. One is a tree skirt for the Christmas tree and the other is a wall hanging. Both came out fine and received good bids on them from the auction.

 Enoy, and be careful of the splinters.


Tuesday, November 22, 2011
Not yet forgotten
While I haven't posted any pictures on this site, I have been busy. I'm taking a metal smithing class to learn more about making hinges for my boxes. Naturally the first real project in the class is a ring. It is not ready for pictures yet, but I have been learning how to solder as well as shape metal. I've worked with brass, copper and silver. Each one has their own unique qualities and it is all fun.
Also, I've finally started painting all of my carvings - Santa's, houses, ghosts and Indians. These are also not ready for pictures. There are other projects in the works, but none of the very far along. I have prepared some maple for a scroll sawing set of collasapable bowls. I'm part way done with a set of hinges. I turned a large button to be used as wall decor. That and trying not to keep too busy.
Well enjoy, and be careful of the splinters.
Wednesday, October 5, 2011
Myrtle Wood Bowl
I couldn't find the camera so I'm posting this from my tablet.byes I know the pictures aren't as nice. ere are 2 pictures of a 5 inch bowl I finally finished. It sat on the lathe for a week waiting for me to go back out and sand it some more.

 Since it is tough to edit, I'm not making any changes.
In addition, I added a couple of pictures of a bottle stopper that I am carving.
Since it is tough to edit, I'm not making any changes.
In addition, I added a couple of pictures of a bottle stopper that I am carving.


Sunday, September 11, 2011
Decorative Horses
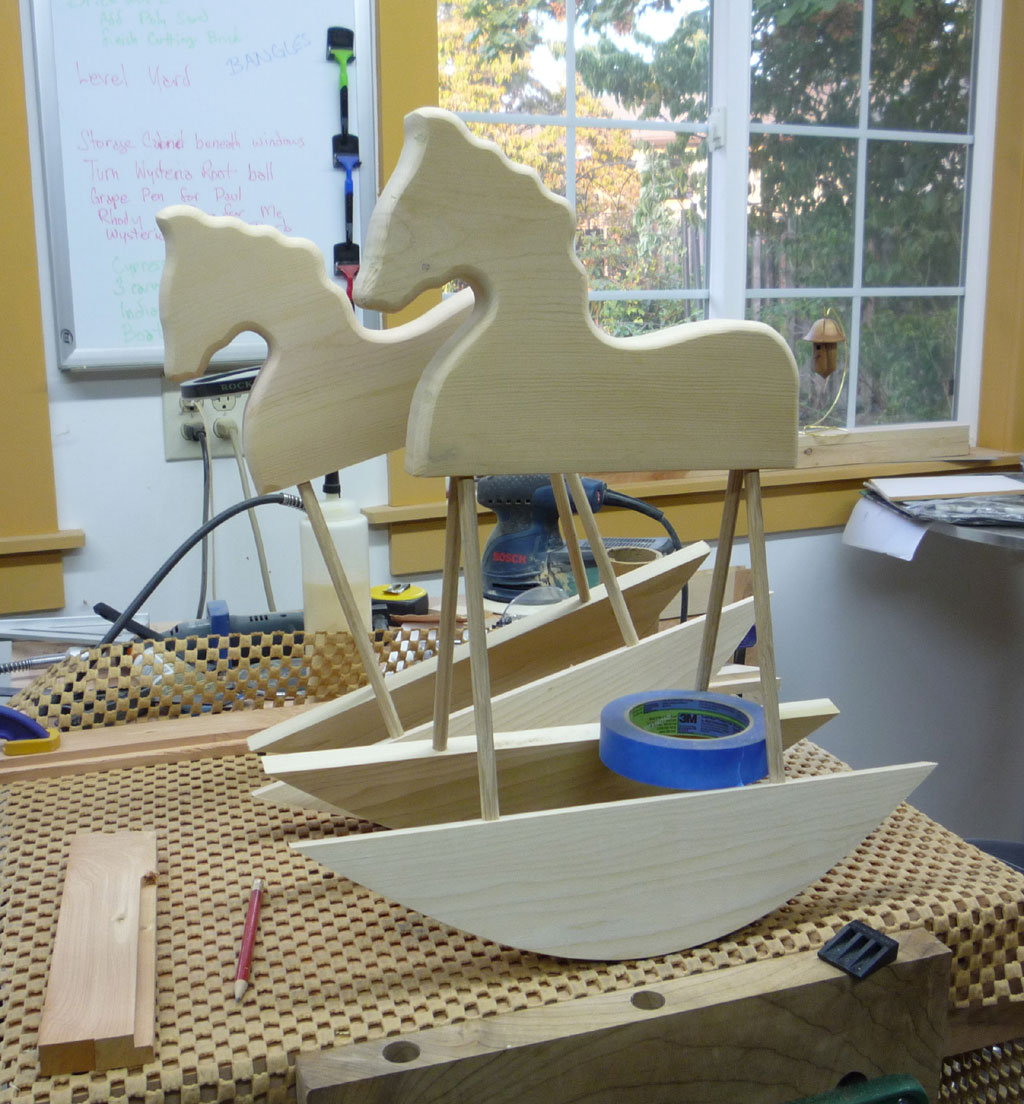
Here are a pair of Horses I've been working on to paint, one for the work auction and one as a gift. The tails are not attached yet and a brace that fits across the bottom rockers has not been added. As you see, without the tail they lean forward way to much. I'm not sure of the weight of the tail but the roll of tape does indeed bring it level. For this project I'll add the tails then use the cross piece to level out the horses, moving it forward or back until they sit level. The tails will be made from a jute or rope, depending upon my attitude and availability at the time. The body of the horse is made from a 2-by, and the rockers are from 3/4" poplar, although pine would work here also. Since these will be painted the material doesn't make a lot of difference. More on this project later.
Enjoy and be careful of the splinters.
Monday, September 5, 2011
Some Carving
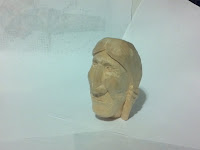
Spent the last holiday weekend in the woods near Mt Rainer, playing golf and carving. Here are 2 pieces that I completed this weekend with a ruler in the picture so you can gauge the size of the work. The larger Santa face is meant to be an ornament, although it can stand on its own. I will add a loop to the top so it can either be hung, or can set on a shelf. The other is a standing figure, as if you couldn't tell. Painting of both of these will occur soon, but not yet. After I finish a couple of more carvings I will start painting all of the pieces. The first picture is larger than the others, so watch the download time.
The weather was hot and dry, for Washington, so I sat outside in the camp chairs letting wood chips fall as they may. The face of the taller Santa is a style new to me, and I had a little trouble with wood tearing around the eyes. I even resharpened the carving tools more often than I normally would to try and smooth things out. Note that I did get the wood from a different source, so I'll be watching the wood other projects that came from the same batch for problems. If I keep having trouble I'll let you know the wood provider.


 Enjoy, and be careful of the splinters.


Tuesday, August 16, 2011
The Shell Game

Earlier this summer, I was at the beach near Gray's Harbor, Washington. One of the small shops there had sea shells for sale at what I thought was a reasonable price. I picked up a couple as an experiment and you'll see one of them here. The glue is still drying on the other. The spindles are turned from walnut and have a stub tenon that matches the holes (kinda) found in the top and bottom of the shell. I attached them with E6000 craft glue as that is a thick glue, dries clear, and has some flexibility. These two shells cost $1.69 each, making this a fun little inexpensive project. They are fragile so I didn't know if I could get them home in one piece, but they made it. The finish on the wood is super glue, as I was trying to keep the pieces as strong as I could.
Enjoy, but be careful of the splinters.
Thursday, August 11, 2011
A Little Magic

A good friend of my sons has 2 daughters that went to Hogwarts Day Camp last week. Each was given a branch to polish and make into a wand. One was lost on the last day of camp, to the disappointment of the girl. Well, since they had asked already if I could help get the wands polished (sanded), I went ahead and made a couple of wands which you see above. Each wand is about 16 inches long, with the business end made from Myrtle wood. The Handle of one is Cherry and the other is Juniper. Since I made these from 2 pieces, I drilled the tenon hole extra long and added a partial feather voluntarily donated by a Blue Bird. Okay, its a feather I found on the ground, and maybe the cats didn't get him.
Enjoy, and be careful of the splinters.
Sunday, July 31, 2011
Sewing Room by IKEA
Some assembly required.

This was my weekend. After spending weeks of unable to decide or describe what was wanted/desired in the sewing room (except not wanting tacky, whatever that means) we went to IKEA and purchased a complete desk set for the sewing room. The white is a melamine covered particle board with precise hole and fittings locations to match perfectly with a metal tube support structure to complete this desk. Everything is included, even the required allen wrenches in multiple separate packages neatly waiting in the warehouse for pick-up. The engineering is very good, the price is low, though I would prefer a better quality material, the price would go up then to match.
I built the table the first night. I had to built it right-side up, not according to the plan, as I had no way to turn the table right side up after assembly. But it went together well and all of the parts fitted to a tea. In fact it looked so nice the next day we went out and bought 3 tall bookcases and 2 short bookcases. One each of those stayed in a different room. These were heavier, which did create a problem for me, but I was able to move them around. The side and end panels of the bookcases are not solid, they just look that way. More like a large torsion box with solid members in just the right places for strength and to assemble the parts.


Note that the bookcases are all off the ground and are hanging with molly bolts near the top. The larger shelves are actually sitting on a frame where the cement juts into the room around the inside perimeter of the house. One day of assembly for the bookcases, one for the table. I've made nothing this week/weekend.
Enjoy, and be careful of the splinters.
Tuesday, July 5, 2011
Another for the Birds
I already posted a series about this bird-house, but it was missing the roof. I got back today from a trip and was able to turn the top. The top is made of 6 pieces of Cedar and 6 thin pieces of juniper. These were glued as sets, then the sets were glued to make halves, then the two halves were glued together to make what you see in the first picture with the top hot glued to a base block. The second shot shows the bird house leaning against the lathe for comparison.


This was a rough bit of turning to reduce the wind vanes to the main body of the roof. Once knocking off the extra wood, it became much easier turning, and a lot fewer flying chunks of wood.

To turn the bottom, I first turned a cavity into my mounting block where I could insert the top, added hot glue, and turn the hollow in the bird house top.


A this point I was able to complete the turning, carefully making sure that the bottom part of the bird house fit snug in the opening in the top. After a creating a place for the top to fit, I hollowed out the top, put finish on the two parts and glued them together.


Enjoy and be careful of the splinters.
Monday, June 27, 2011
Another Birdhouse
This is a collection of pictures I took while turning the second birdhouse. The pictures show it all. Note that I took these with my Acer tablet and wrote this while I was waiting for the drill to cool off.
With any luck the pictures stayed in the order I took them. The software I used is called Blogger and was written for the Android tablet. No preview to see how it would look, also no editing of the pictures and all of the writing is with my thumbs.
I had to move into the house to get close enough to the wifi to post this article.
Enjoy, and be careful of the splinters.


Note that the pictures did not come in the requested order, I went in and re-arranged them.
Wednesday, June 22, 2011
Turned Bird House


Here is a quick project that was fun. Again, as with the pens below, this is a project to raise money for our Holiday Party in December. The body of the bird house is Myrtle Wood and the roof is spalted maple (I think). The perch is walnut and the red bird I carved from basswood and colored with water colors. Yes, the house is hollow out and the walls are about 1/8" thick. No reason to get too crazy here. The bird is attached with super-glue. The finish is a walnut oil & shellac mix.
Enjoy, and be careful of the splinters.
Wednesday, June 15, 2011
Getting Ready for Our Summer Auction


Every year at work we raise money for our Holiday Party with an auction of donated items. Here are two corian pens and a Cedar Bottle Stopper I turned. The first pen was from a piece of corian that I thought was to bland to be very viable. As a pen, it looks pretty good. As a counter, just not enough color for me. The second pen is from a small piece of blue corian that I thought was pretty good looking, and it is. I think I would like to try the blue again using a black tip and center band. That means I would have to turn those too, which doubles the time and work. The fit and finish on these pens are good, so with a replacement ink cartridge I would sell either for $45.


The last item on today's posting is a simple bottle stopper I made from ceder and put a walnut oil/shellac finish on it. Cedar turns quick and sanding is more of a concern due to the softness of the wood. The two colors are because the piece is off the edge of the log, giving it a lot more character.


Enjoy, and be careful of the splinters.
Tuesday, June 7, 2011
Pen Box
 Well, I did decide to try and make a small box for the pen. The first picture shows the box, cut with 10 degree angles. I cut the channel of both the top and bottom as one piece using the table saw, many passes across the saw, then hand sanded to remove the resulting grooves. It's about 7 inches long. The main body is Myrtle Wood and the ends I think are from Yew. Whenever I cut or sand it it smells bad, more like 'ewww'. Still, it looks nice though yet unfinished. I hand-made a single hinge for the box also from Yew thinking that it would be strong enough for these pieces. The hinge pin did not drill exactly centered. When I opened the box you can see how the lid cants to one side. Not good.
 I removed the hinge from the box, (no it wasn't easy) and put supports to lock the lid in place on both ends. These I cut on the scroll saw and sanded them to fit. I made a handle from Yew for the top and it has become a lift-box. I sanded a little from the ends of the lid to allow the lid to slide on a little better. On shot shows the pen set into foam that I had available. The finish is BLO and a layer of Watco wax. It looks nice.
Enjoy, but be careful of the splinters.
Wednesday, June 1, 2011
A Duck Pen
It has been a while since I posted. But visiting Maui does get you side-tracked. Here is a pen I made for a student graduating from the University of Oregon. The nib, center-band and top were turned from a black piece of acrylic to match the ribbon in the block I picked up from Woodcraft. Of course I had a few issues but the pen looks good and the fit is great. All three pieces I added fit perfect. I replaced the ink cartridge with a Cross brand so it will write better.


Still need to decide if I should make a box for it, or pick one up at either Woodcraft or the Rockler store.
I found a mouse to use as a prop for the pen, no significance, just handy.
Enjoy, but be careful of the splinters.

Still need to decide if I should make a box for it, or pick one up at either Woodcraft or the Rockler store.
I found a mouse to use as a prop for the pen, no significance, just handy.
Enjoy, but be careful of the splinters.
Monday, May 2, 2011
New paint
My spouse was out of town, so I cleaned out the second sewing room, painted it twice, then installed a Dupont floor (like Per go, only different).
Note that I was a box of flooring short, and I've been laying this floor for about 6 years, it was no longer in stock. I bought the closest color match I could, and decided not to worry about it.
Note I posted this from my android tablet.


Tuesday, April 19, 2011
From Corian
I just got my new pen mandrel from Pen State Industries and it came with a free 7mm drill. Too bad I bought on last week. The bushing for the 7mm pens are larger than the fittings for the kits I got from Rockler, so I have to remember to grab the right set, or just use the micrometer more consistently. The guide bushings may actually fit the pens from Pen State, but I haven't bought any kits from them, yet. They do have a nice variety as well as some high quality sets. Anyway, the shot with the corian I picked up the other day shows the mandrel. The shaft length is adjustable on this mandrel, which is really nice.
I tried to show how I press the pen pieces together, but the picture is fuzzy. The point was that I turned two blocks for the lathe that allow me to use the lathe itself as the press. Makes it easier than buying another tool. These wear our so I get to keep turning these blocks and tossing the old ones. I considered using corian for the blocks, but I thought it might be too hard.
And of course, the final shot. This pen is laying on the back side of the piece of corian I turned.
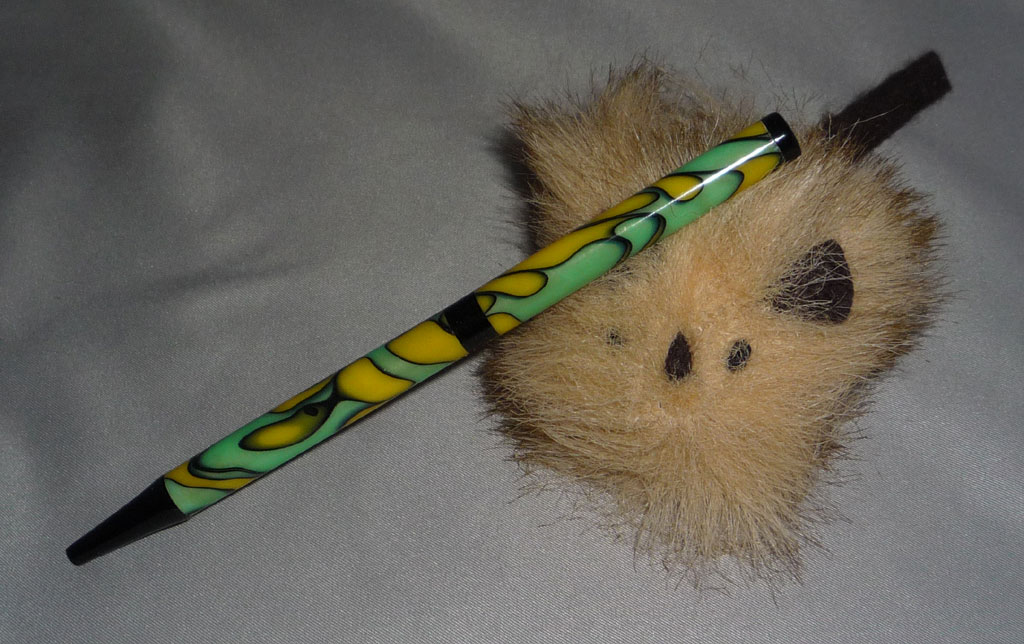
A final shot is a green and yellow pen. The center band is black acrylic that is part of the pen. I also turned a black tip for the pen, which you will see when the pen is finished. I haven't decided about whether to put a clip on the pen, or just top it with a black turning. Come back later and see.
Enjoy and be careful of the splinters.

I tried to show how I press the pen pieces together, but the picture is fuzzy. The point was that I turned two blocks for the lathe that allow me to use the lathe itself as the press. Makes it easier than buying another tool. These wear our so I get to keep turning these blocks and tossing the old ones. I considered using corian for the blocks, but I thought it might be too hard.

And of course, the final shot. This pen is laying on the back side of the piece of corian I turned.

A final shot is a green and yellow pen. The center band is black acrylic that is part of the pen. I also turned a black tip for the pen, which you will see when the pen is finished. I haven't decided about whether to put a clip on the pen, or just top it with a black turning. Come back later and see.

Enjoy and be careful of the splinters.
Subscribe to:
Posts (Atom)